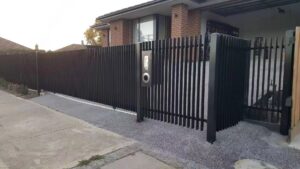
A boundary fence project sounds straightforward until you are standing in the middle of it — one neighbour waiting for an update, the posts not quite lining up with the property survey, and a question mark hanging over whether your council requires a permit.
Getting a good neighbour fence right takes more than buying the right materials. It takes a clear process: the right neighbour conversations first, the correct preparation work second, and a precise installation sequence that delivers a fence that looks equally clean from both sides — which is the whole point.
This guide walks through the complete installation process for a steel good neighbour fence in Melbourne, from the pre-work to the final panel. Whether you are managing the project yourself or briefing a contractor, understanding each step helps you get a better result.
Before you touch the ground: the steps that happen first
The most common reason good neighbour fence installations go poorly has nothing to do with the fence itself. It is skipping — or rushing — the steps that happen before installation begins.
Step 1: Confirm the boundary line
Install the fence in the wrong place and you face the prospect of removing and reinstating it at your own cost. Before any work starts, verify the boundary line using your Certificate of Title and a copy of the property survey plan. If the boundary is unclear — which is common on older Melbourne blocks where no physical markers remain — a licensed surveyor can peg the boundary accurately. This cost is minor compared to the cost of a dispute or a fence that has to be moved.
Do not rely on existing structures like old timber fences as a guide. They frequently wander off the true boundary line over time.
Step 2: Issue a Fencing Notice to your neighbour
Under the Fences Act 1968 (Victoria), you are required to give your neighbour a Fencing Notice before proceeding with a new or replacement dividing fence. The notice sets out the proposed fence type, materials, location, and estimated cost. Your neighbour has 30 days to agree, propose changes, or formally dispute.
For a good neighbour fence specifically, this conversation is usually straightforward — the symmetrical design means your neighbour sees an identical face on their side, which removes the most common objection before it arises. Most neighbours agree readily once they understand the equal-presentation design.
Our guide to good neighbour fencing — what it is and why it matters covers the legal framework and cost-sharing rules under Victorian law in full if you need a reference before issuing the notice.
Step 3: Check permit requirements with your council
In most Melbourne residential zones, a boundary fence up to 2.0 metres in height does not require a planning permit — but a building permit may still apply depending on your council area and the specific fence specification. Rules vary across Melbourne’s 31 local government areas.
Check with your council’s building department before work starts, not after. Boswen manages this permit assessment process as part of every installation scope, but if you are managing the project independently, a quick call to your council’s planning team will clarify what is required for your specific address.
Step 4: Call Dial Before You Dig
Any post-setting involves digging into ground that may have underground services — gas lines, electrical cables, water pipes, and telecommunications infrastructure. Call Dial Before You Dig (1100) or submit a request at www.1100.com.au to receive a plans package for your site before any excavation begins. This is a legal obligation in Victoria and takes one to two business days to process.
Materials and tools required
For a standard steel good neighbour fence installation in Melbourne, you will need:
Materials:
- Steel good neighbour fence panels (pre-fabricated or site-built, matched to your specified height)
- Steel posts — RHS or C-section, sized to fence height (typically 65×65mm or 75×75mm for residential heights)
- Concrete mix for post footings
- Post caps
- Powder-coated capping rail
- Self-drilling screws or bolts (stainless or galvanised)
- String line and pegs
Tools:
- Post-hole digger or auger
- Spirit level (1.2m minimum length for posts)
- String line
- Tape measure
- Angle grinder with cutting disc
- Drill with driver bits
- Rubber mallet
- Safety glasses and gloves
Pre-fabricated steel good neighbour fence panels from Boswen arrive powder-coated and ready to install, which eliminates the on-site panel assembly step and significantly reduces installation time.
The installation sequence
Step 5: Mark out the post positions
With the boundary confirmed and a string line run along the full fence length, mark post positions at even intervals — typically 2.4 metres for standard residential panel widths. Consistent spacing is critical with good neighbour fencing because the panel width is fixed. Irregular spacing creates gaps or requires non-standard panel cuts that compromise the symmetrical appearance.
Mark each post position with a stake and double-check the spacing before digging anything.
Step 6: Dig the post footings
Post footings must be sized to suit both fence height and Melbourne’s soil conditions.
As a general guide for Melbourne residential installations:
| Fence height | Minimum footing depth | Footing diameter |
|---|---|---|
| 1.2m | 450mm | 200mm |
| 1.5m | 500mm | 250mm |
| 1.8m | 600mm | 300mm |
| 2.1m | 700mm | 300mm |
Melbourne soil note: A large portion of Melbourne sits on reactive clay — particularly the northern suburbs (Broadmeadows, Epping, Thomastown), the western corridor (Sunshine, St Albans, Melton), and parts of the south-east (Dandenong, Cranbourne). Reactive clay expands when wet and contracts when dry, which exerts lateral force on fence posts over time. Posts in these areas should be set at the deeper end of the acceptable range and concrete mixed to full depth — not just collar-poured. Undersized footings in reactive clay are one of the most common reasons fence posts lean within three to five years of installation.
Step 7: Set the posts
With footings dug, set the end posts first and run a string line between them at the top of the intended post height. This gives you a reference line for the intermediate posts.
For each post:
- Place the post in the footing hole, checking it is plumb on both faces with your spirit level.
- Pour concrete and work it around the post base to eliminate voids — tamp as you fill.
- Recheck plumb immediately after pouring, before the concrete begins to set.
- Brace the post using temporary timber bracing while the concrete cures. Do not proceed to panel installation until the concrete has cured for a minimum of 24 hours — 48 hours in cold or wet conditions.
All posts should finish at the same height and sit on the same line. Take the time to get this right. Everything that follows depends on it.
Step 8: Fix the rails
Horizontal rails are fixed between posts at top, middle, and bottom positions. Use the rail fixing brackets supplied with your panel system, ensuring the rail is level and centred between post faces. Rails should sit flush with the post inner faces so that the alternating pale assembly conceals them fully from both sides.
On longer fence runs with intermediate posts, check that rail heights are consistent across the full run — not just between adjacent posts. A laser level or quality string line set at each rail height saves time and catches errors before pales go on.
Step 9: Fix the alternating pales
This is the step that defines good neighbour fencing. Pales are fixed alternately — one to the front face of the rail, the next to the rear face — along the full length of the fence.
The spacing between pales must be consistent and centred on the rail depth. Uneven pale spacing is the most visible sign of a rushed installation and compromises the symmetrical appearance that the fence type is specifically designed to deliver. Use a spacing jig — a simple timber block cut to the required gap width — to maintain consistency as you work along the run.
Fix each pale with two self-drilling screws per rail connection, top and bottom. Check the pale is vertical before driving the second screw. A twisted pale will not sit flush against the rail face and will be visible in the finished fence line.
Step 10: Fit the capping rail
Once all pales are fixed, the capping rail is installed along the top of the fence, spanning between posts and concealing the top edges of the pales and the top rail. The capping should be level across the full run and mitre-jointed or butt-jointed at post positions, with all joins fully sealed to prevent water ingress.
Capping is powder-coated to match the fence colour. Take care not to scratch the coating during installation — touch up any marks before the job is handed over.
Step 11: Install the gate
If the boundary fence includes a pedestrian or vehicle entry gate, it is fitted last once the fence line is complete and all posts are confirmed plumb and aligned.
A swing gate is the most common pedestrian access solution on residential boundaries — it mounts directly to an end post or purpose-set gate post and requires minimal hardware. For vehicle access, a sliding gate or cantilever gate is typically the right choice depending on the available run space.
The gate frame material, profile, and powder-coat colour should match the fence system exactly. A mismatched gate — wrong colour, wrong pale profile, or different rail depth — stands out at the most prominent point of the boundary and undermines the finished appearance.
Common mistakes to avoid
Experienced installers encounter the same problems repeatedly on poorly executed good neighbour fence jobs. Being aware of them saves rework.
Skipping the boundary survey. Installing on the wrong line is an expensive mistake. Always confirm the boundary before the first post goes in.
Ignoring soil conditions. Standard footing depths work in stable soil. In Melbourne’s reactive clay zones, undersized footings lead to leaning posts within a few years. Size footings to the actual soil profile, not the minimum on a spec sheet.
Rushing the concrete cure. Fitting panels to posts with fresh concrete that has not fully cured causes movement that affects alignment across the full run. Wait the full cure time.
Inconsistent pale spacing. The alternating pale arrangement looks precise when it is done well and amateurish when it is not. Use a spacing jig throughout.
Mismatched gate and fence. The gate should be specified at the same time as the fence, from the same supplier, to the same colour and profile. Adding a gate later from a different source almost always results in a visible mismatch.
No permit check. Installing without the required building permit creates complications at resale and can result in a council order to remove or modify the fence.
When to use a professional installer
Most of the installation steps above are achievable for an experienced DIY tradesperson — particularly for short, straight fence runs on flat ground with stable soil. For the majority of Melbourne residential and commercial projects, however, professional installation is the better outcome on most measures.
Professional installers bring:
- Equipment (post augers, compaction tools, laser levels) that significantly improves accuracy and speed
- Experience with Melbourne’s soil conditions across different suburbs — reactive clay in the west and north, sandy profiles in the bayside suburbs, rock profiles in parts of the hills and ranges
- Familiarity with council permit requirements for each local government area
- Responsibility for the finished installation, including rectifying alignment issues or material defects
Boswen’s installation teams work across metropolitan Melbourne on residential, commercial, and light industrial good neighbour fence projects. We manage the full scope — from site assessment and permit confirmation through to panel installation, gate fitting, and clean-up.
Learn more about what to expect when working with professional fencing contractors in Melbourne before you decide which approach suits your project.
Getting a quote
If you are ready to move forward — or just working out what a good neighbour fence installation would cost for your specific boundary — Boswen can provide a site assessment and detailed quote with no obligation.
View Boswen’s good neighbour fencing systems →
Frequently asked questions
How long does a good neighbour fence installation take? A standard residential run of 20 to 30 metres typically takes one to two days with an experienced two-person installation crew — one day for posts and rails, one day for pales, capping, and gate. Longer runs or more complex sites (sloped ground, reactive clay, multiple gate openings) take longer.
Can a good neighbour fence be installed on a slope? Yes. There are two approaches: a raked installation, where the fence follows the slope continuously; or a stepped installation, where the fence drops in horizontal sections. The right approach depends on the degree of slope and the aesthetic preference. Boswen assesses this at the site visit.
Do I need my neighbour’s agreement before starting? Under the Fences Act 1968 (Victoria), a Fencing Notice must be issued and the 30-day response period observed before work begins, unless both parties have reached a written agreement before that. Starting without a valid process in place puts you at risk of a legal dispute even if the fence itself is well-built.
Can the fence be installed in sections if the budget is tight? Yes — a boundary fence can be installed progressively if budget is a constraint. The key is to plan the full run at the outset so that post positions, heights, and panel widths are consistent across all stages. Starting without a full plan and adding later often creates visible joins and height inconsistencies between sections.
What maintenance does a steel good neighbour fence need? Very little. A hot-dip galvanised and powder-coated steel fence requires no repainting. An annual wash-down with water removes surface grime. An inspection every five years for post movement, capping seal integrity, and any mechanical damage is sufficient for most Melbourne residential installations.
Related reading
- Good neighbour fencing explained: what it is and why it matters — Start here if you are still deciding whether this fence type is right for your property.
- The real cost of poor fencing installation and how to avoid it — What goes wrong when installation is rushed or under-specified, and how to protect your investment.
- What to expect when working with professional fencing contractors in Melbourne — How a professional installation is scoped, quoted, and delivered.
- Choosing the right fencing contractors for your property in Melbourne — Questions to ask before you commit to a contractor.
Boswen Aust Pty Ltd is a Melbourne-based fencing and metalworks contractor. We design, manufacture, and install good neighbour fencing, steel security fencing, palisade fencing, gates, and metalwork across metropolitan Melbourne and regional Victoria.